docker 网络
通过前面的学习,我们已经可以通过 image 来创建相关的容器,例如:创建一个 mysql 容器,nginx 容器、php-fpm 容器。但是我们想要使用这些容器作为开发或者生产的环境还缺少关键的一步,那就是容器间的通信。这一集我们来学习容器间的网络通信
容器间网络互连 Docker 默认提供了三种网络模式、分别是bridge、host、none。可以使用如下命令查看
1 2 3 4 5 $ docker network ls NETWORK ID NAME DRIVER SCOPE b7ad6ddfa6be bridge bridge local 8eceb8218986 host host local 0cedda606a66 none null $ docker network ls NETWORK ID NAME DRIVER SCOPE b7ad6ddfa6be bridge bridge local 8eceb8218986 host host local 0cedda606a66 none null local
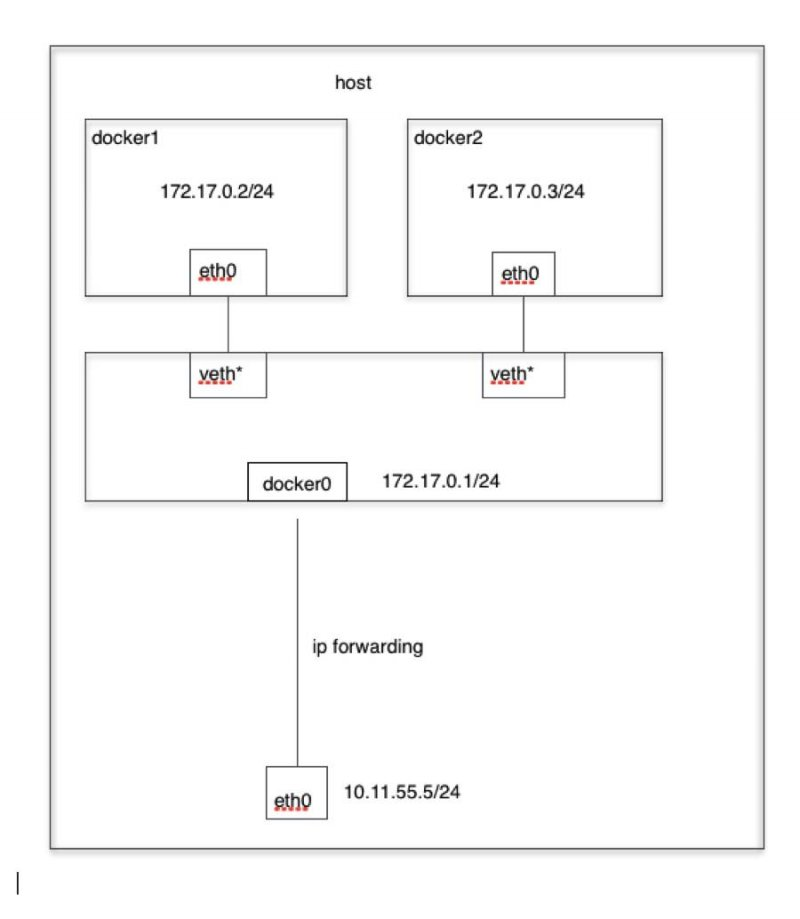
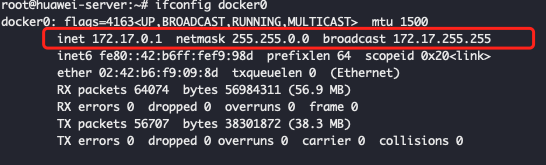
bridge 桥接模式 原理:在主机上虚拟出一个docker0 的网桥 ,默认创建的容器都会虚拟出网卡和这个网桥连接,容器的 ip 地址从 172.17.0.0/16 地址段生成。
由于在 mac 和 windows 系统上,docker 的运行方式不太一样(在win、mac 上安装 docker,实际上是安装了一个 docker 虚拟机,而我们创建的容器都是跑在 docker 虚拟机中的)。
mac系统下进入docker 虚拟机 命令
1 $ screen ~/Library/Containers/com.docker.docker/Data/vms/0/tty
docker 版本小于18.06 则使用如下命令
1 $ screen ~/Library/Containers/com.docker.docker/Data/com.docker.driver.amd64-linux/tty
测试桥接模式($ 提示符为主机、# 提示符为容器内) 使用 busybox 镜像进行测试。该镜像非常小并且安装了ping、ifconfig等实用工具,非常适合测试。
1 2 3 4 5 6 7 8 9 10 11 12 13 14 15 16 17 18 19 20 21 22 23 24 25 26 27 28 29 30 31 32 33 34 35 36 37 38 39 40 41 42 43 44 45 46 47 48 49 50 51 52 53 54 $ docker run --name box1 -it --rm busybox sh // 测试网络连通 /# ping www.baidu.com PING www.baidu.com (180.97.34.96): 56 data bytes 64 bytes from 180.97.34.96: seq =0 ttl=45 time =10.489 ms 64 bytes from 180.97.34.96: seq =1 ttl=45 time =10.512 ms 64 bytes from 180.97.34.96: seq =2 ttl=45 time =10.424 ms 64 bytes from 180.97.34.96: seq =3 ttl=45 time =10.409 ms ^C --- www.baidu.com ping statistics --- 4 packets transmitted, 4 packets received, 0% packet loss round-trip min/avg/max = 10.409/10.458/10.512 ms // 查看网卡 ip 地址 /# ifconfig eth0 Link encap:Ethernet HWaddr 02:42:AC:11:00:07 inet addr:172.17.0.7 Bcast:172.17.255.255 Mask:255.255.0.0 UP BROADCAST RUNNING MULTICAST MTU:1500 Metric:1 RX packets:16 errors:0 dropped:0 overruns:0 frame:0 TX packets:8 errors:0 dropped:0 overruns:0 carrier:0 collisions:0 txqueuelen:0 RX bytes:1421 (1.3 KiB) TX bytes:622 (622.0 B) // 退出容器。使用 Ctrl+P+Q 退出容器但是容器不会关闭 // 查看 box1 容器的详细信息,只截取了部分内容 $ docker inspect box1 . . ."Networks" : { "bridge" :{ "IPAMConfig" :null, "Links" :null, "Aliases" :null, "NetworkID" :"b7ad6ddfa6beac6b0ebf87dcec3d7ee933478592f16d48b3c01b28cd6a48a7f9" , "EndpointID" :"30eb2f7a0b5e4dbebe8a8f0522a01e105c65fe6a14d0a6ffe02120af009cff27" , "Gateway" :"172.17.0.1" , "IPAddress" :"172.17.0.7" , "IPPrefixLen" :16, "IPv6Gateway" :"" , "GlobalIPv6Address" :"" , "GlobalIPv6PrefixLen" :0, "MacAddress" :"02:42:ac:11:00:07" , $ docker run --name box1 -it --rm busybox sh // 测试网络连通 /# ping www.baidu.com PING www.baidu.com (180.97.34.96): 56 data bytes 64 bytes from 180.97.34.96: seq =0 ttl=45 time =10.489 ms 64 bytes from 180.97.34.96: seq =1 ttl=45 time =10.512 ms 64 bytes from 180.97.34.96: seq =2 ttl=45 time =10.424 ms 64 bytes from 180.97.34.96: seq =3 ttl=45 time =10.409 ms ^C --- www.baidu.com ping statistics --- 4 packets transmitted, 4 packets received, 0% packet loss round-trip min/avg/max = 10.409/10.458/10.512 ms // 查看网卡 ip 地址 /# ifconfig eth0 Link encap:Ethernet HWaddr 02:42:AC:11:00:07 inet addr:172.17.0.7 Bcast:172.17.255.255 Mask:255.255.0.0 UP BROADCAST RUNNING MULTICAST MTU:1500 Metric:1 RX packets:16 errors:0 dropped:0 overruns:0 frame:0 TX packets:8 errors:0 dropped:0 overruns:0 carrier:0 collisions:0 txqueuelen:0 RX bytes:1421 (1.3 KiB) TX bytes:622 (622.0 B) // 退出容器。使用 Ctrl+P+Q 退出容器但是容器不会关闭 // 查看 box1 容器的详细信息,只截取了部分内容 $ docker inspect box1 . . ."Networks" : { "bridge" :{ "IPAMConfig" :null, "Links" :null, "Aliases" :null, "NetworkID" :"b7ad6ddfa6beac6b0ebf87dcec3d7ee933478592f16d48b3c01b28cd6a48a7f9" , "EndpointID" :"30eb2f7a0b5e4dbebe8a8f0522a01e105c65fe6a14d0a6ffe02120af009cff27" , "Gateway" :"172.17.0.1" , "IPAddress" :"172.17.0.7" , "IPPrefixLen" :16, "IPv6Gateway" :"" , "GlobalIPv6Address" :"" , "GlobalIPv6PrefixLen" :0, "MacAddress" :"02:42:ac:11:00:07" , "DriverOpts" :null } } . . .
通过上面的例子我们可以很直观的看到 box1 容器使用的是 bridge 模式,分配的 ip 地址为 172.17.0.7 并且可以访问互联网。
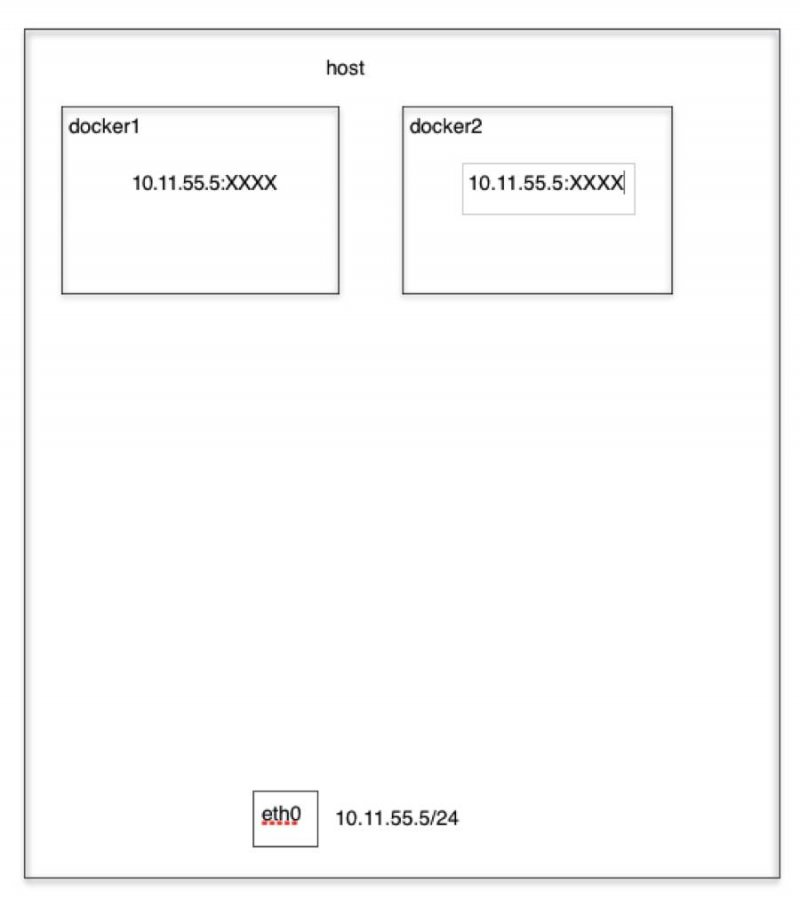
Host 主机模式($ 提示符为主机、# 提示符为容器内) 原理:容器不会虚拟出自己的网卡,而是使用宿主机的IP。
1 2 3 4 5 6 7 8 9 10 11 12 13 14 15 16 17 18 19 20 21 22 23 24 25 26 27 28 29 30 31 32 33 34 // 创建一个容器并加入 host 网络 $ docker run --name box2 -it --network host busybox // 在容器中查看网卡 eth0 eth0 Link encap:Ethernet HWaddr FA:16:3E:F4:68:C0 inet addr:192.168.0.3 Bcast:192.168.0.255 Mask:255.255.255.0 inet6 addr: fe80::f816:3eff:fef4:68c0/64 Scope:Link UP BROADCAST RUNNING MULTICAST MTU:1500 Metric:1 RX packets:612175 errors:0 dropped:0 overruns:0 frame:0 TX packets:203387 errors:0 dropped:0 overruns:0 carrier:0 collisions:0 txqueuelen:1000 RX bytes:725999816 (692.3 MiB) TX bytes:74349925 (70.9 MiB) // 测试网络连通 /# ping www.baidu.com PING www.baidu.com (180.97.34.96): 56 data bytes 64 bytes from 180.97.34.96: seq =0 ttl=45 time =10.489 ms 64 bytes from 180.97.34.96: seq =1 ttl=45 time =10.512 ms 64 bytes from 180.97.34.96: seq =2 ttl=45 time =10.424 ms 64 bytes from 180.97.34.96: seq =3 ttl=45 time =10.409 ms // 退出容器。使用 Ctrl+P+Q 退出容器但是容器不会关闭 //在宿主机上查看网卡 eth0 $ ifconfig eth0 eth0: flags=4163<UP,BROADCAST,RUNNING,MULTICAST> mtu 1500 inet 192.168.0.3 netmask 255.255.255.0 broadcast 192.168.0.255 inet6 fe80::f816:3eff:fef4:68c0 prefixlen 64 scopeid 0x20<// 创建一个容器并加入 host 网络 $ docker run --name box2 -it --network host busybox // 在容器中查看网卡 eth0 eth0 Link encap:Ethernet HWaddr FA:16:3E:F4:68:C0 inet addr:192.168.0.3 Bcast:192.168.0.255 Mask:255.255.255.0 inet6 addr: fe80::f816:3eff:fef4:68c0/64 Scope:Link UP BROADCAST RUNNING MULTICAST MTU:1500 Metric:1 RX packets:612175 errors:0 dropped:0 overruns:0 frame:0 TX packets:203387 errors:0 dropped:0 overruns:0 carrier:0 collisions:0 txqueuelen:1000 RX bytes:725999816 (692.3 MiB) TX bytes:74349925 (70.9 MiB) // 测试网络连通 /# ping www.baidu.com PING www.baidu.com (180.97.34.96): 56 data bytes 64 bytes from 180.97.34.96: seq =0 ttl=45 time =10.489 ms 64 bytes from 180.97.34.96: seq =1 ttl=45 time =10.512 ms 64 bytes from 180.97.34.96: seq =2 ttl=45 time =10.424 ms 64 bytes from 180.97.34.96: seq =3 ttl=45 time =10.409 ms // 退出容器。使用 Ctrl+P+Q 退出容器但是容器不会关闭 //在宿主机上查看网卡 eth0 $ ifconfig eth0 eth0: flags=4163<UP,BROADCAST,RUNNING,MULTICAST> mtu 1500 inet 192.168.0.3 netmask 255.255.255.0 broadcast 192.168.0.255 inet6 fe80::f816:3eff:fef4:68c0 prefixlen 64 scopeid 0x20<link > ether fa:16:3e:f4:68:c0 txqueuelen 1000 (Ethernet) RX packets 612230 bytes 726004260 (726.0 MB) RX errors 0 dropped 0 overruns 0 frame 0 TX packets 203435 bytes 74354859 (74.3 MB) TX errors 0 dropped 0 overruns 0 carrier 0 collisions 0
通过上面的例子我们可以很直观的看到 box2 容器使用的是 host 模式,ip 地址和宿主机一致,也能访问外网。
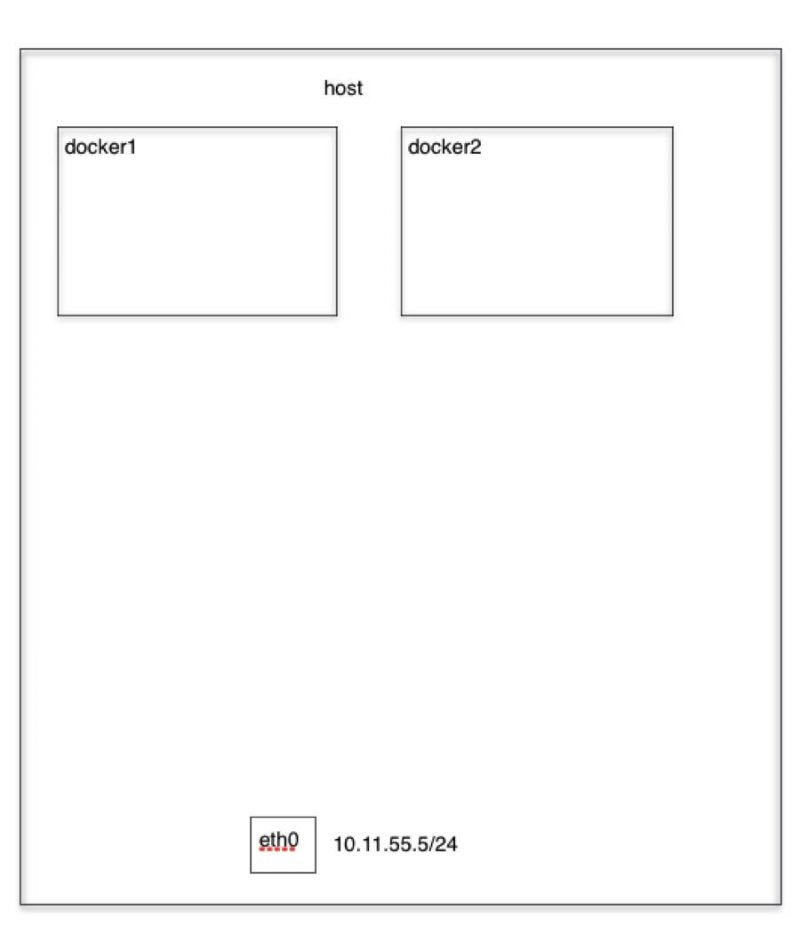
none 无网络模式 不给容器提供任何网络配置,只有lo 网络接口。需要我们自己为Docker容器添加网卡、配置IP等。
1 2 3 4 5 6 7 8 9 10 11 12 13 14 15 16 17 18 19 20 21 22 23 24 25 26 27 28 29 30 31 32 33 34 35 $ docker run --name box3 -it --network none --rm busybox lo Link encap:Local Loopback inet addr:127.0.0.1 Mask:255.0.0.0 UP LOOPBACK RUNNING MTU:65536 Metric:1 RX packets:0 errors:0 dropped:0 overruns:0 frame:0 TX packets:0 errors:0 dropped:0 overruns:0 carrier:0 collisions:0 txqueuelen:1000 RX bytes:0 (0.0 B) TX bytes:0 (0.0 B) $ docker inspect box3 . . ."Networks" :{ "none" :{ "IPAMConfig" :null, "Links" :null, "Aliases" :null, "NetworkID" :"0cedda606a66614ba025ff7a992cb0d405fb567ff8da240310b96fa59f5fe99a" , "EndpointID" :"e4fd85c2629d2524928f34fb428305bf4cf2d99195ff5ce7d428a9cff14902c0" , "Gateway" :"" , "IPAddress" :"" , "IPPrefixLen" :0, "IPv6Gateway" :"" , "GlobalIPv6Address" :"" , "GlobalIPv6PrefixLen" :0, "MacAddress" :"" , $ docker run --name box3 -it --network none --rm busybox lo Link encap:Local Loopback inet addr:127.0.0.1 Mask:255.0.0.0 UP LOOPBACK RUNNING MTU:65536 Metric:1 RX packets:0 errors:0 dropped:0 overruns:0 frame:0 TX packets:0 errors:0 dropped:0 overruns:0 carrier:0 collisions:0 txqueuelen:1000 RX bytes:0 (0.0 B) TX bytes:0 (0.0 B) $ docker inspect box3 . . ."Networks" :{ "none" :{ "IPAMConfig" :null, "Links" :null, "Aliases" :null, "NetworkID" :"0cedda606a66614ba025ff7a992cb0d405fb567ff8da240310b96fa59f5fe99a" , "EndpointID" :"e4fd85c2629d2524928f34fb428305bf4cf2d99195ff5ce7d428a9cff14902c0" , "Gateway" :"" , "IPAddress" :"" , "IPPrefixLen" :0, "IPv6Gateway" :"" , "GlobalIPv6Address" :"" , "GlobalIPv6PrefixLen" :0, "MacAddress" :"" , "DriverOpts" :null } } . . .
通过上面的例子我们可以很直观的看到 box3 容器使用的是 none 模式,没有网卡,只有 lo 网络接口。
外部访问容器
容器中可以运行一些网络应用,要让外部也可以访问这些应用,可以通过 -P 或 -p 参数来指定端口映射。
当使用 -P(大写) 标记时,Docker 会随机映射一个 49000~49900 的端口到内部容器开放的网络端口。
-p 则可以指定要映射的端口,并且,在一个指定端口上只可以绑定一个容器。支持的格式有 ip:hostPort:containerPort | ip::containerPort | hostPort:containerPort。
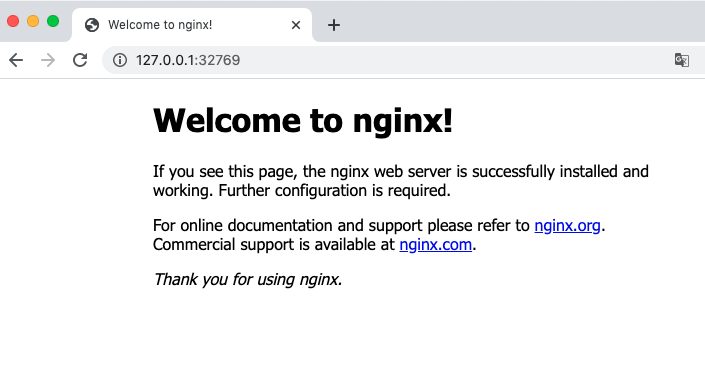
创建一个 nginx 容器,使用 -P 随机产生一个端口号
1 2 3 4 5 6 $ docker run --name test -P -d nginx 769acc819c0dc26848b93c3e39040ba410385c8c7536a39c2a586896e120ae86 $ docker container ls IMAGE CONTAINER ID STATUS PORTS NAMES nginx 769acc819c0d Up 4 minutes 0.0.0.0:32769->80/tcp $ docker run --name test -P -d nginx 769acc819c0dc26848b93c3e39040ba410385c8c7536a39c2a586896e120ae86 $ docker container ls IMAGE CONTAINER ID STATUS PORTS NAMES nginx 769acc819c0d Up 4 minutes 0.0.0.0:32769->80/tcp test
本机访问结果
其他端口映射配置可以查看链接 https://yeasy.gitbook.io/docker_practice/network/port_mapping
使用自定义网络实现容器间的互连
在实际应用中各容器间的通信不是通过 ip 地址,而是通过容器名称来连接的,那么这种事如何实现的呢?继续往下看吧。
创建一个自定义网络 1 2 3 4 5 6 $ docker network create my-net a4806e9a4874118f1269992086dbe4137024b53603a4ac68cd6c0c548257b6b7 $ docker network ls NETWORK ID NAME DRIVER SCOPE a4806e9a4874 my-net bridge $ docker network create my-net a4806e9a4874118f1269992086dbe4137024b53603a4ac68cd6c0c548257b6b7 $ docker network ls NETWORK ID NAME DRIVER SCOPE a4806e9a4874 my-net bridge local
创建 2 个容器将其加入自定义网络 1 2 3 4 5 6 7 8 9 10 11 12 13 $ docker run --name box1 -it --rm --network my-net busybox sh $ docker run --name box2 -it --rm --network my-net busybox sh $ docker container ls --format $ docker run --name box1 -it --rm --network my-net busybox sh $ docker run --name box2 -it --rm --network my-net busybox sh $ docker container ls --format "table {{.Image}}\t{{.ID}}\t{{.Status}}\t{{.Names}}" --all IMAGE CONTAINER ID STATUS NAMES busybox 5e6a4861f857 Up About a minute box2 busybox 1d7fa8762b4d Up 2 minutes box1
通过容器名称进行通信 1 2 3 4 5 6 7 8 9 10 11 // 进入 box2 容器进行 ping 测试连通 $ docker exec -it box2 sh PING box1 (172.19.0.2): 56 data bytes 64 bytes from 172.19.0.2: seq =0 ttl=64 time =0.049 ms 64 bytes from 172.19.0.2: seq =1 ttl=64 time =0.063 ms 64 bytes from 172.19.0.2: seq =2 ttl=64 time =0.057 ms 64 bytes from 172.19.0.2: seq =3 ttl=64 time =0.061 ms ^C
好了,今天的网络相关内容就到这里啦,下集见。